This guide walks you through connecting Atlas to Refari, publishing Atlas projects to your Refari job board, managing them day to day, and checking that applications and candidate progress are moving between the two systems.

What the integration does
Atlas is your applicant tracking system (ATS), the system where you manage recruitment projects, people and applications. In Atlas, the recruitment record is a project, which may also be described as a job or role. This guide uses project for the Atlas record and job or advert for the vacancy on your website. Your public job board is the careers page on your website where anyone can browse and apply for your advertised roles.
| Information | Direction | Timing |
|---|---|---|
| Projects and Atlas users | Atlas to Refari | Projects about every 10 minutes, users during regular reconciliation |
| Applications, registrations and referrals | Refari to Atlas | Sent when the person submits the form |
| Candidate project stages | Atlas to Refari | About every 10 minutes |
| Full reconciliation | Atlas to Refari | Every 6 hours |
Note: No Refari section needs to be set up inside Atlas after you create the API key. You do not need to configure Atlas webhooks or maintain a second copy of an advert in Refari.Before you start
You will need:
- An Atlas account admin login. Only account admins can create an API key.
- The Refari Integrator connection link sent to you by Refari. Use it within 30 days. If it has expired, ask Refari Support for a new link.
- A list of the categories you want candidates to use when filtering your job board.
Step 1: Create the Job Board Category custom attribute
Refari reads this Project custom attribute to place each advert in the right category filter on your job board. The exact name matters because Refari looks for that name when it imports a project.
- Click the cog at the bottom left, open Company Settings, select Custom Attributes, then choose Project.
- Create a Project custom attribute named exactly Job Board Category.
- Set the type to single select.
- Add the options that fit your team. For example: Accounting and Finance, Engineering, Information Technology, and Sales and Marketing.
- Save the field, then make sure your team selects one option on every project intended for the job board.
Use Company Settings, Custom Attributes and Project whenever you need to update these options.
Idea: Keep the list short and use candidate-friendly labels. A controlled single select list avoids separate filters such as "IT", "I.T." and "Information Technology" appearing on the same board.Refari also recognises the earlier custom attribute name Job Category, without regard to capital letters. If neither custom attribute has a value, Refari falls back to the job function. The standard name for new connections is Job Board Category.
Step 2: Create the Atlas API key
An API key is a secure credential that lets Refari read the Atlas information needed for your board and write candidate activity back to Atlas.
- Sign in to Atlas as an account admin.
- Click the cog at the bottom left, open Company Settings, then Developers, then Create a new API key.
- Give the key a clear name, such as Refari.
- Use the table below as the complete scope list. Choose Read-write only for the listed scopes and leave every other scope switched off.
Only an Atlas account admin can open Company Settings and create this key.
| Scope in Atlas | Setting |
|---|---|
| People | Read-write |
| Jobs | Read-write |
| Companies | Read-write |
| Contacts | Read-write |
| Users | Read-write |
| Applicants | Read-write |
| Files | Read-write |
| Campaigns | Leave off |
| Finance | Leave off |
| Meetings | Leave off |
| Emails | Leave off |
- Create the key and copy the full value while Atlas shows it.
Keep the API key private. Treat it like a password and paste it only into the Refari connection page. If it is exposed, revoke it in Atlas and ask Refari Support for a new connection link.Step 3: Paste the key into Refari
- Open the Refari Integrator connection link sent to you by Refari.
- Select Atlas if the page asks you to choose your ATS.
- Paste the full key into API Key. This is the only required Atlas credential. If you see Agency ID, leave it blank unless Refari has given you a value.
- Select Connect Atlas.
Use the table in Step 2 as the full scope guide for this connection. Give Read-write access to People, Jobs, Companies, Contacts, Users, Applicants and Files. Leave Campaigns, Finance, Meetings and Emails switched off.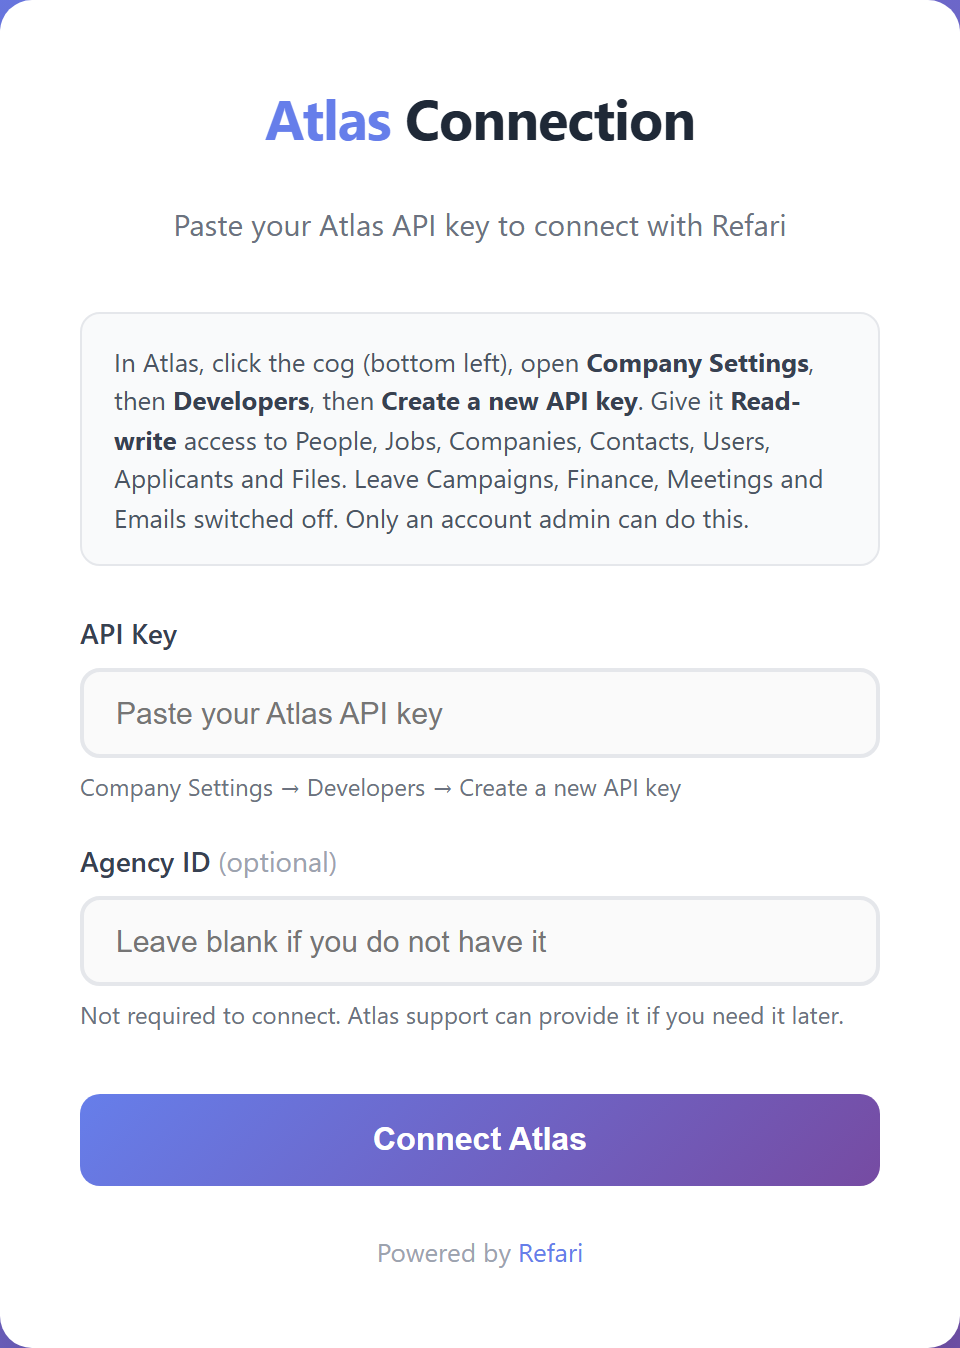
Connection complete: When you see Atlas Connected, Refari begins importing your Atlas users first, followed by eligible projects. There are no webhook settings to add.Step 4: Make your first Atlas project visible on Refari
A project appears on your Refari job board only when all three publishing rules are true:
- Public Job Advert is switched on.
- The project state is active.
- The project has not been deleted.
Protect confidential projects. An active Atlas project is not automatically a public advert. The Public Job Advert switch on the project's Job Description tab controls whether Refari may publish it. The switch is off by default. Turn it on only for a project intended for your public website.The project must also contain the information Refari requires to build the advert:
- ☐ Title: Check that the project has a job title. Without one, Refari has no advert title and the project will not import.
- ☐ Owner: Check that the project has an owner and that the owner has an email address in Atlas. Without both, Refari cannot link the advert to the right recruiter and the project may not import.
- ☐ Job Board Category: Select a value in Job Board Category, or set the job function. Without either value, Refari cannot categorise the advert and the project will not import.
- ☐ Location: Check that the project has a location. Without one, Refari cannot assign the advert to a location and the project will not import.
- ☐ Contract type: Set the Atlas contract type. Refari displays this as Work type on the advert. Without one, Refari cannot set the advert's work type and the project will not import.
On the project, open the Job Description tab and find the Public Job Advert switch among the advert details. It stays off until you switch it on. Turn it on only when the project is ready for your public website. If it is not on, Refari does not publish the advert: no switch, no advert.
Save the project, then check your Refari job board. Refari starts a job poll every 10 minutes and staggers connected accounts by up to about 2 minutes. In practice, allow about 10 to 12 minutes for a new project or edit to appear. It is not an instant update.
Your job sync is working when the project appears on the board with the correct title, category, location, Work type and recruiter.Using the integration day to day
Edit a live advert
Edit the project in Atlas and save it. Refari updates the existing advert on the next job poll. Do not maintain a separate version in Refari.
Take an advert down
For the quickest take-down, switch Public Job Advert off or close the project in Atlas. The board normally catches up within about 10 to 12 minutes. Deleting a project can take up to six hours to clear from the board, so switch Public Job Advert off or close the project first when the advert must come down promptly.
Add another project
Create and maintain it in Atlas. Complete the five required items, make it active, then switch Public Job Advert on when it is ready for the public board.
Show the right recruiter
Atlas users are imported as Refari recruiters. Refari links an Atlas user to an existing recruiter by email address when needed. Every Atlas user who owns public projects should have a current email address on their user record. Without one, Refari cannot create that recruiter profile and their projects may not import correctly. Add the email in Atlas and save the user.
Enter salary text that Refari can read
Atlas stores salary as free text, so use a clear number or range and include the pay period. These formats parse cleanly:
- $120,000 - $140,000 per annum
- 90k-110k
- 150000 per annum
Words alone, such as Competitive or Negotiable, DOE, do not produce a salary figure. A bare hourly number below 100, such as $65 per hour, supplies the hourly period but not the numeric figure. Check the live advert after the next poll whenever the salary wording changes.
What happens when someone applies
For an application that includes a CV, Refari performs these actions in order:
- Uploads the CV to Atlas as a resume file.
- Creates an applicant linked to the relevant project, with the candidate's contact details and a cover note when the candidate supplied one.
- Adds the applicant under Sourcing then Applicants. Applicants arrive waiting for approval. After the recruiter approves the application, they manage the candidate from the project's Candidates tab.
- Checks Atlas about every 10 minutes and sends the candidate's project stage back to Refari. A rejection is recorded as Rejected.
If your Refari application form allows applications without a CV, Refari creates or matches the person in Atlas and adds them directly to the project's candidate pipeline. A candidate registration creates or updates an Atlas person and attaches their CV when supplied. A referral creates or matches a person and adds the referral details as a note.
Candidate source: Atlas keeps the person's original source. If that person already existed from your own sourcing, Refari does not replace the source when their details are updated.In Atlas, the recruiter opens Sourcing then Applicants to find a new applicant. For an application with a CV, the entry includes the person's contact details, a cover note when supplied, and the CV. The recruiter approves the application there, then manages the candidate from the project's Candidates tab.
Test the connection properly
- Choose a public, active project that has all five required items.
- Open the advert on your Refari job board and submit an application with a CV.
- Open Sourcing then Applicants and confirm that the applicant appears with the CV.
- Approve the application, open the project's Candidates tab, move the candidate to another project stage, then allow about 10 to 12 minutes for Refari to receive the stage.
- Repeat with a registration form if candidate registrations are part of your Refari set-up.
Do not test with a recruiter's work email address. That address already belongs to a user or recruiter record, so candidate matching can collide with it and make a healthy connection look broken. Use a personal address and a different address for each test candidate.Troubleshooting
| Symptom | Most likely cause | What to do |
|---|---|---|
| A project is not on the board | Public Job Advert is off, the project is not active, or it has been deleted. | Use the switch only if the role is safe to publish, make the project active, then save it. |
| A public, active project is still missing | The location, contract type, owner or category is missing. Category is the most common. | Complete the missing location, contract type, owner or category in Atlas, then save the project. |
| A recent change is not visible yet | The next job poll has not run. | Wait 10 to 12 minutes, then refresh the job board page. |
| Everything stopped at once | The Atlas API key was deleted or regenerated, or its permissions changed. | Create a replacement key with the scopes from Step 2, then use a new Refari connection link to reconnect. Do not send the key by email. |
Final Notes
Keep Atlas as the source of truth for projects, project owners and candidate stages. If you still need help, raise a ticket through support.refari.co and include the Atlas project title, what you expected to happen, and the approximate time of your last test.
Other articles you might be interested in: How Refari applications, registrations and referrals appear in Atlas | How to Re-send Applications or Registrations to Your Applicant Tracking System
Was this article helpful?
That’s Great!
Thank you for your feedback
Sorry! We couldn't be helpful
Thank you for your feedback
Feedback sent
We appreciate your effort and will try to fix the article