This article explains what the Job Board Settings page does and how to use it to control which job ads appear on each of your job boards. A public job board is the careers board embedded on your website, open to anyone; Refari lets you run several boards at once (for example a main board plus a specialist board on a landing page), each showing its own selection of your jobs. You may also see this page called Filter Settings: that is the heading shown on the page itself, while the menu item is called Job Board Settings. They are the same page.
What you can use multiple job boards for
Because each board carries its own selection of jobs, extra boards let you put the right slice of your roles in front of the right audience:
- A board per location. Run a separate board for each city, region or country you recruit in, so your Sydney office page shows only Sydney roles while the main careers page still shows everything.
- A board per sector or industry. Give a specialist area its own board: an engineering landing page that lists only engineering roles, a healthcare page that lists only healthcare roles.
- A board per brand or website. If you run more than one brand or microsite, each site can embed its own board scoped to the roles that brand handles.
- A board for a campaign. A graduate intake or seasonal hiring push can have a landing page whose board shows only the campaign roles, and the board can be deleted when the campaign ends.
- Keeping a slice off a page. Exclude mode works the other way: show everything except the categories or locations you pick, for example keeping executive roles off a general vacancies page.
In every case the pattern is the same: create a board, choose which categories or locations it includes or excludes, and have your web developer embed that board's key on the relevant page. The rest of this article walks through exactly that.
Where to find it, and who can use it
In your Refari dashboard, go to "Settings > Job Board Settings".
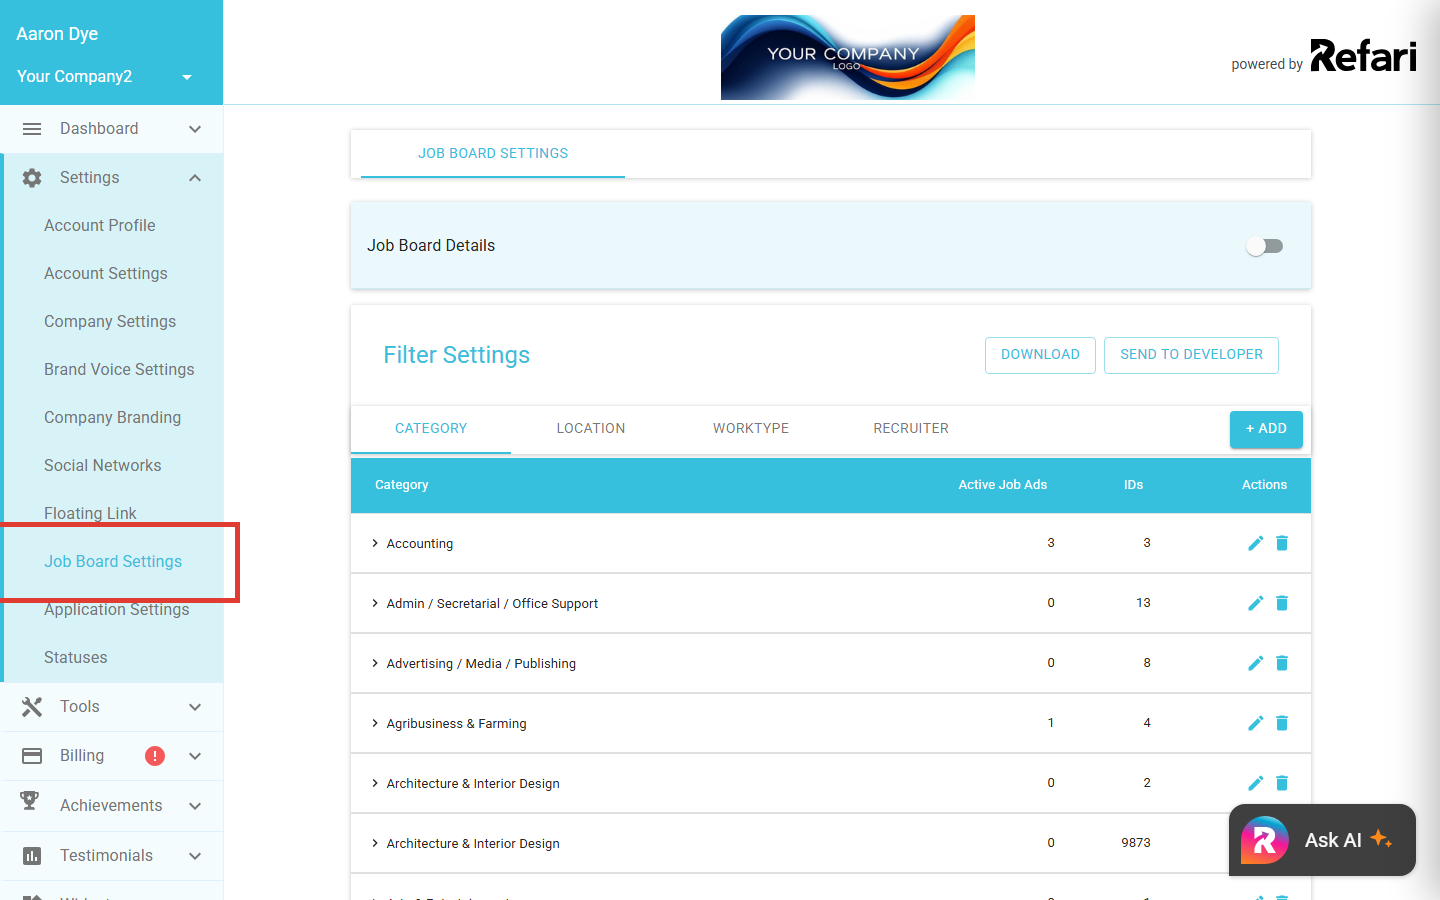
This page is available to Company Admins only. Managing job boards changes what candidates see on your website, so it sits with the administrator role. If you are unsure which role you hold, the full breakdown of what each role can do is in Refari Roles ↗.
Key concepts before you start
- A job board is an embed key. Every board has its own API Key. Your web developer places that key in the widget code on your website, and the board then shows whichever jobs its settings allow. You can run up to 10 boards.
- Every account has a default board. It is created automatically and carries a Default badge (usually named Main Job Board). The default board always shows all of your public job ads.
- The filter values are your job categories, locations and work types. If your account is connected to an ATS (applicant tracking system) such as JobAdder, these values are synced across from your ATS automatically. They are managed there, not in Refari; more on this further down.
Managing your job boards
Switch on the Job Board Details toggle at the top of the page to open the board panel. Here you can see the selected board, its API Key (with a copy button for handing to your web developer) and its Base URL.
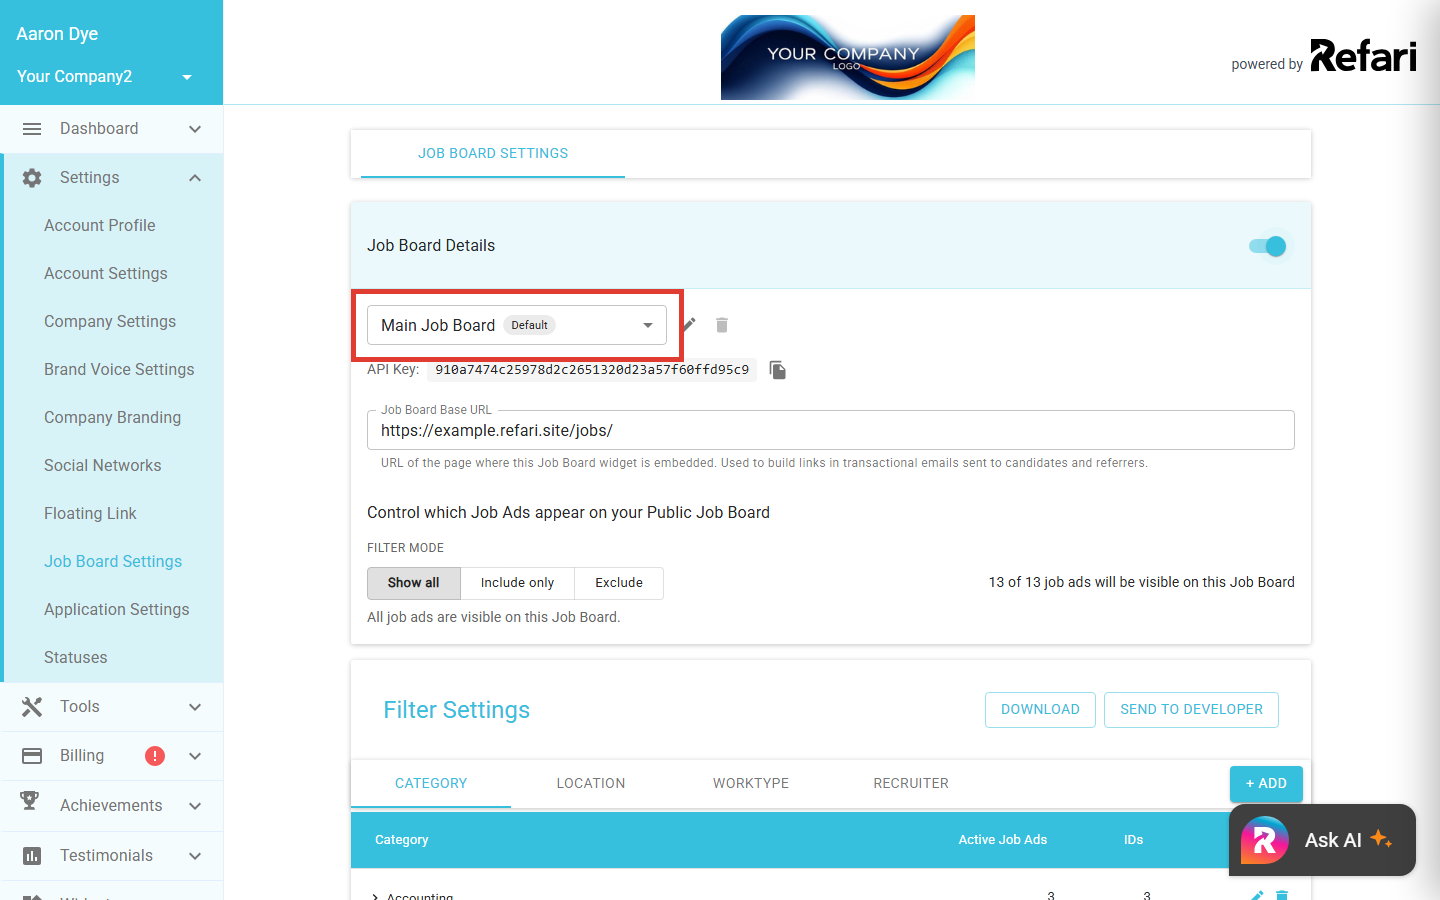
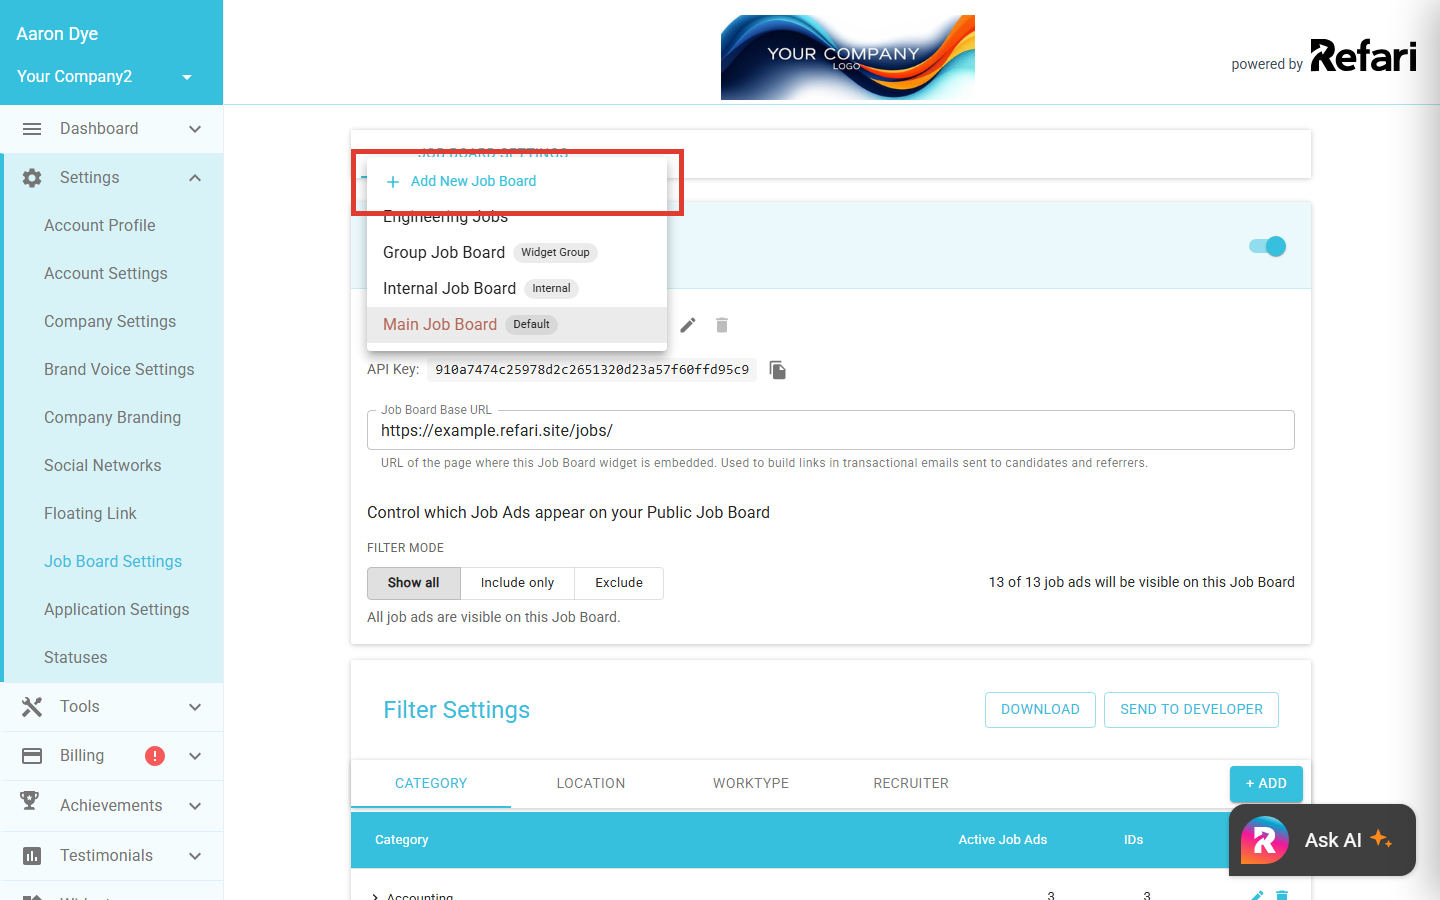
Open the board dropdown to switch between your boards or to create a new one with Add New Job Board. The pencil icon renames the selected board and the bin icon deletes it.
Each board also has its own Job Board Base URL, the address of the page on your website where that board is embedded. Refari uses it to build the links in emails sent to candidates and referrers, so it is worth setting for every board; the steps are in How to set a Base URL for each of your job boards ↗.
Idea: Name each board after where it lives or what it shows, for example "Engineering landing page" or "Sydney roles". Six months from now, "Board 2" will not tell you anything.Warning: Deleting a job board cannot be undone, and any widget on your website still using that board's API Key will stop showing jobs. Check with your web developer that a board's key is no longer embedded anywhere before you delete it.Choosing which jobs appear on a board
With a board selected, the Filter Mode controls decide which of your job ads that board shows:
- Show all: the board shows every public job ad. This is the default.
- Include only: the board shows only job ads from the categories and locations you select.
- Exclude: the board shows everything except job ads from the categories and locations you select.
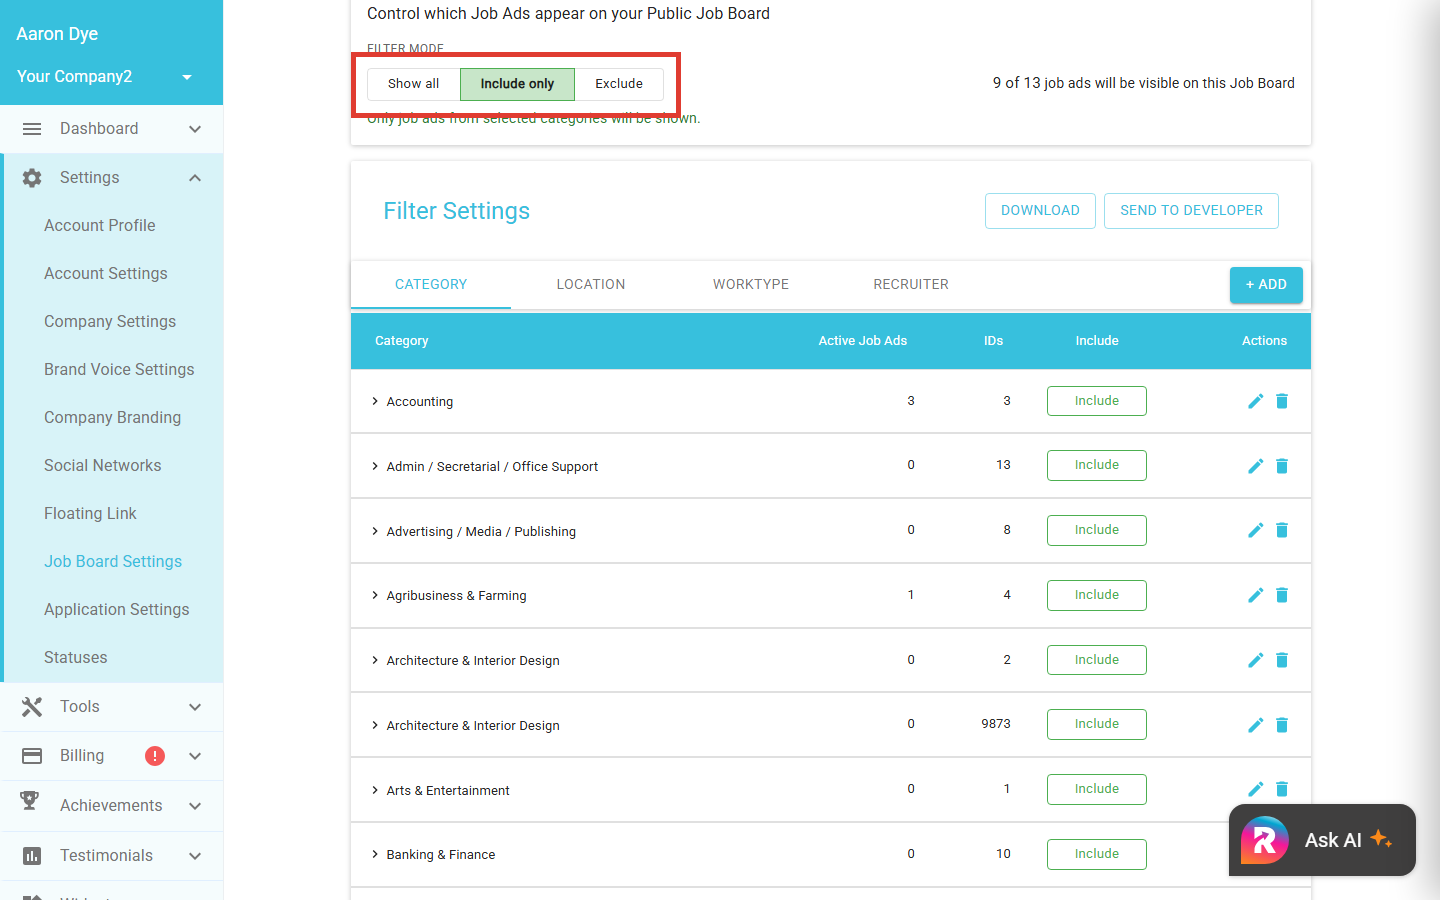
To scope a board:
- Select the board in the dropdown.
- Choose Include only or Exclude as the Filter Mode and apply the change.
- In the table below, an Include (or Exclude) button appears on each category and location row. Click it on each value you want; selected rows turn green.
- Click Apply Changes in the bar at the bottom of the table. Nothing is saved until you do; Revert discards your selections.
Some categories and locations contain child values: click the chevron on a row to expand it. Board filters work on the top-level values only, so including or excluding a parent covers all of its children; you cannot pick out a single child value on its own.
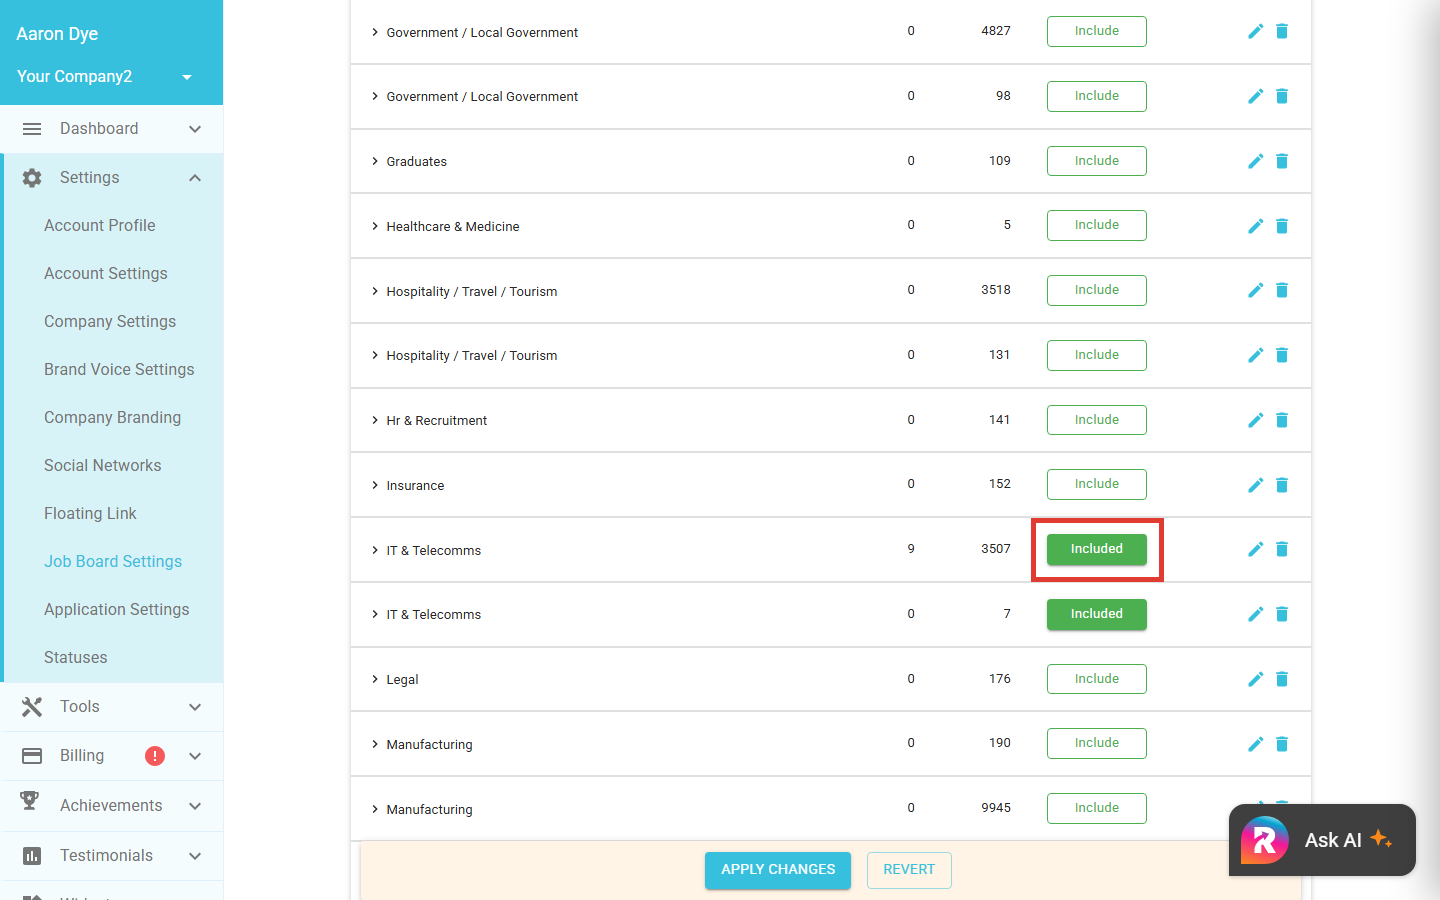
Success check: The counter next to the Filter Mode (for example "9 of 13 job ads will be visible on this Job Board") updates as you apply changes. If the number matches what you expect, the board is scoped correctly.Note: Your default board (the one with the Default badge) always shows all job ads; its Filter Mode is locked to Show all. The same applies to Internal and Group boards. To show a subset of jobs on your website, create a new board, scope it, and have your web developer swap the new board's API Key into the page. In Include only mode, always select at least one category or location before you rely on the counter.What board filters do and don't change
| Affected by a board's filter settings | Not affected |
|---|---|
| The job ads shown on that board on your website, including the job search and each job's detail page. | Your XML feeds to external job sites (LinkedIn, SEEK and similar), which have their own per-ad visibility controls. |
| The filter dropdowns candidates see on that board. They shrink automatically to match the jobs on the board, so a scoped board keeps its own dropdowns tidy. | Job alert emails to candidates, which match on each subscriber's own criteria. |
| Any other widget on your site embedded with that same board's API Key. | Which jobs are imported from your ATS into Refari in the first place. |
Changing the filter values themselves
The lower half of the page (the card headed Filter Settings) lists the values behind the filters: your categories, locations and work types, with a count of active job ads against each.
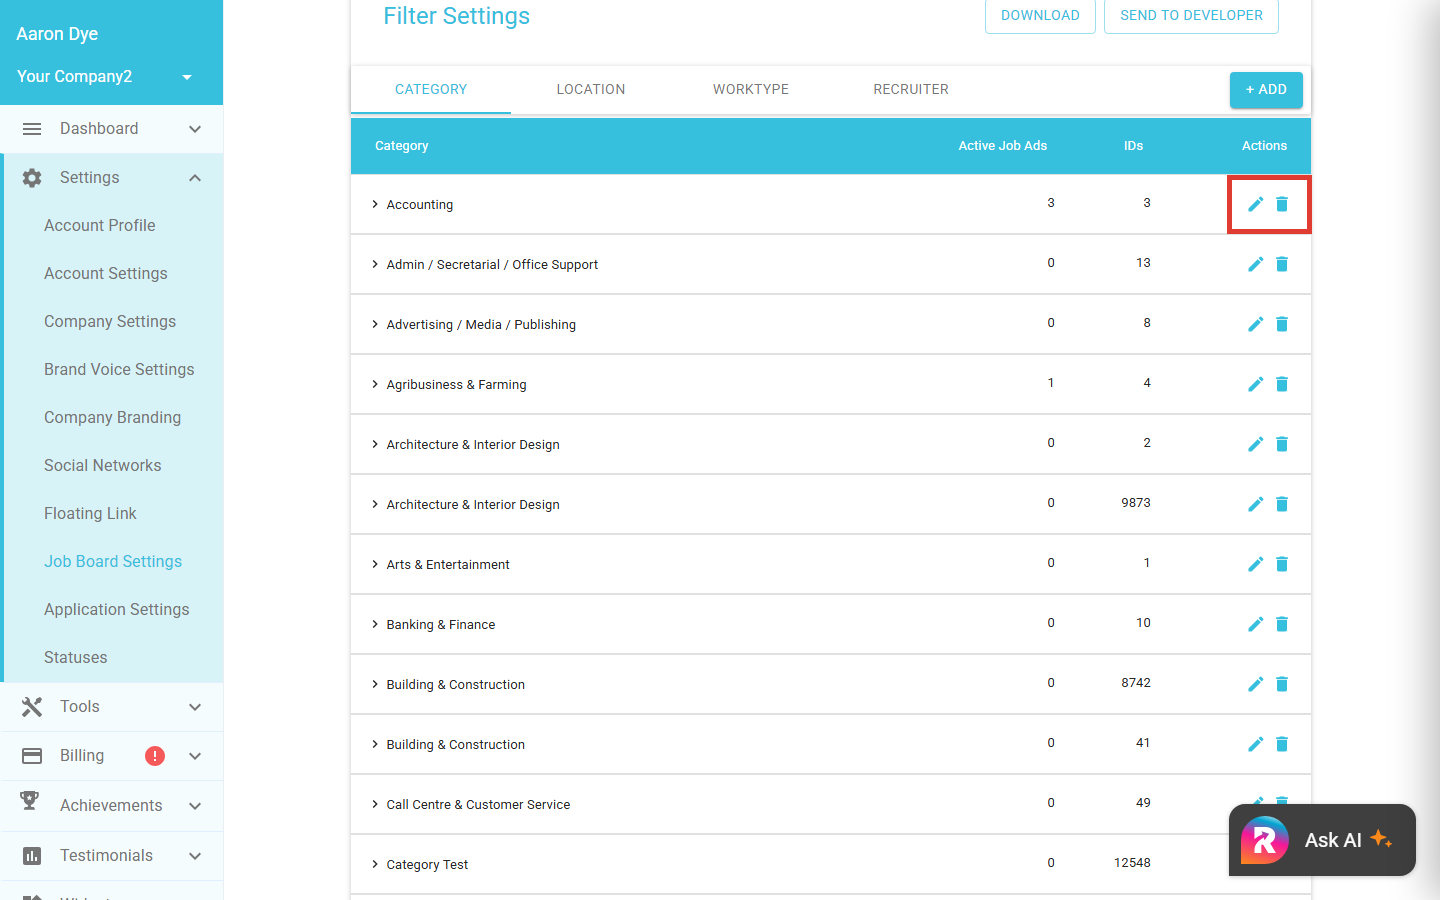
If your account is connected to an ATS, these values are a mirror of your ATS's own classification lists, kept up to date by the sync. That is why editing or deleting them inside Refari is switched off for ATS-connected accounts: a change made in Refari would break the link with your ATS. Clicking the pencil or bin icon on a row will show the message "You do not have permission to modify filter settings." This is not a missing user permission, and it is the same for every role including Company Admins.
To rename a category, add a new location or tidy up work types, make the change in your ATS and it will flow through to Refari on the next sync (for JobAdder, usually within the hour). JobAdder users can follow the steps in How to add or remove Categories, Locations and Work types ↗.
If you are planning a bigger restructure, for example renaming several categories or introducing a new hierarchy, plan it with us first. Candidates’ job alerts are tied to the existing values, so a restructure can quietly break their alerts unless the old values are mapped to the new ones. The process is explained in Managing Changes to Categories, Locations, and Work Types on Your Job Board ↗.
Accounts that are not connected to an ATS manage these values here directly: the + Add button and the pencil and bin icons are fully available to Company Admins on those accounts.
Note: When a brand-new category is created in your ATS, it appears in Refari automatically once a job ad uses it. Boards in Include only mode will not show the new category's jobs until you add it to their include list, so revisit your scoped boards after adding categories in your ATS.Troubleshooting
"You do not have permission to modify filter settings."
You clicked the pencil or bin icon on a category, location or work type row. On ATS-connected accounts those values can only be changed in the ATS, as described above, whatever your role. If your account is not ATS-connected and you still see this message, you need the Company Admin role; a Company Admin at your company can update your role by following How to change user membership level in Refari ↗.
A job is not appearing on your board
First check whether the ad made it into Refari at all, and whether its category or location falls outside a scoped board's include list. The full checklist of causes is in Why a job advert might not appear on your Refari job board ↗.
You cannot change the Filter Mode on your main board
The Filter Mode buttons are greyed out on the board carrying the Default badge, by design. Create a new board, scope that instead, and have your web developer embed the new board's API Key on the relevant page.
Final Notes
If you only run one board and want it to show everything, you never need this page beyond setting your Base URL. Reach for extra boards when a specific page of your website should show a specific slice of your jobs. And if you get stuck, contact us through the Support Centre and we will point you in the right direction.
Other articles you might be interested in: How to set a Base URL for each of your job boards | How to add or remove Categories, Locations, Work types (JobAdder) | Why a job advert might not appear on your Refari job board
Was this article helpful?
That’s Great!
Thank you for your feedback
Sorry! We couldn't be helpful
Thank you for your feedback
Feedback sent
We appreciate your effort and will try to fix the article